Friday, July 29, 2011

Other Ways to Achieve Depth (Perspective)

A number of artists have added "tools" to their depth creating efforts.  These include Giorgione, Titian, Monet, Cezanne, Hawthorne, Hensche, and Payne.

According to Hawthorne and Hensche, Monet found that every plane change has an associated colour change.  They modelled depth using colour instead of drawing type value change.  This suited Monet who was primarily interested in light effects on colour.

Cezanne eventually developed a system that included the picture plane as part of the structure of the painting.  He created depth by employing visible lines (including outlines) and overlapping planes.  He often painted over these lines.  These planes were not required to diminish in size according to scientific perspective.  Here are a few examples.

Movement into Depth


No Outlines - Movement into Depth


Linear Perspective


Here the eye is lead into deep space where it drops out of the picture.  Cezanne wished to control this or eliminate it.  This is standard perspective.  He did a number of things to avoid this.  We can discuss this later.  Meanwhile, one can apply these ideas to all genres including the landscape.

Similar Values

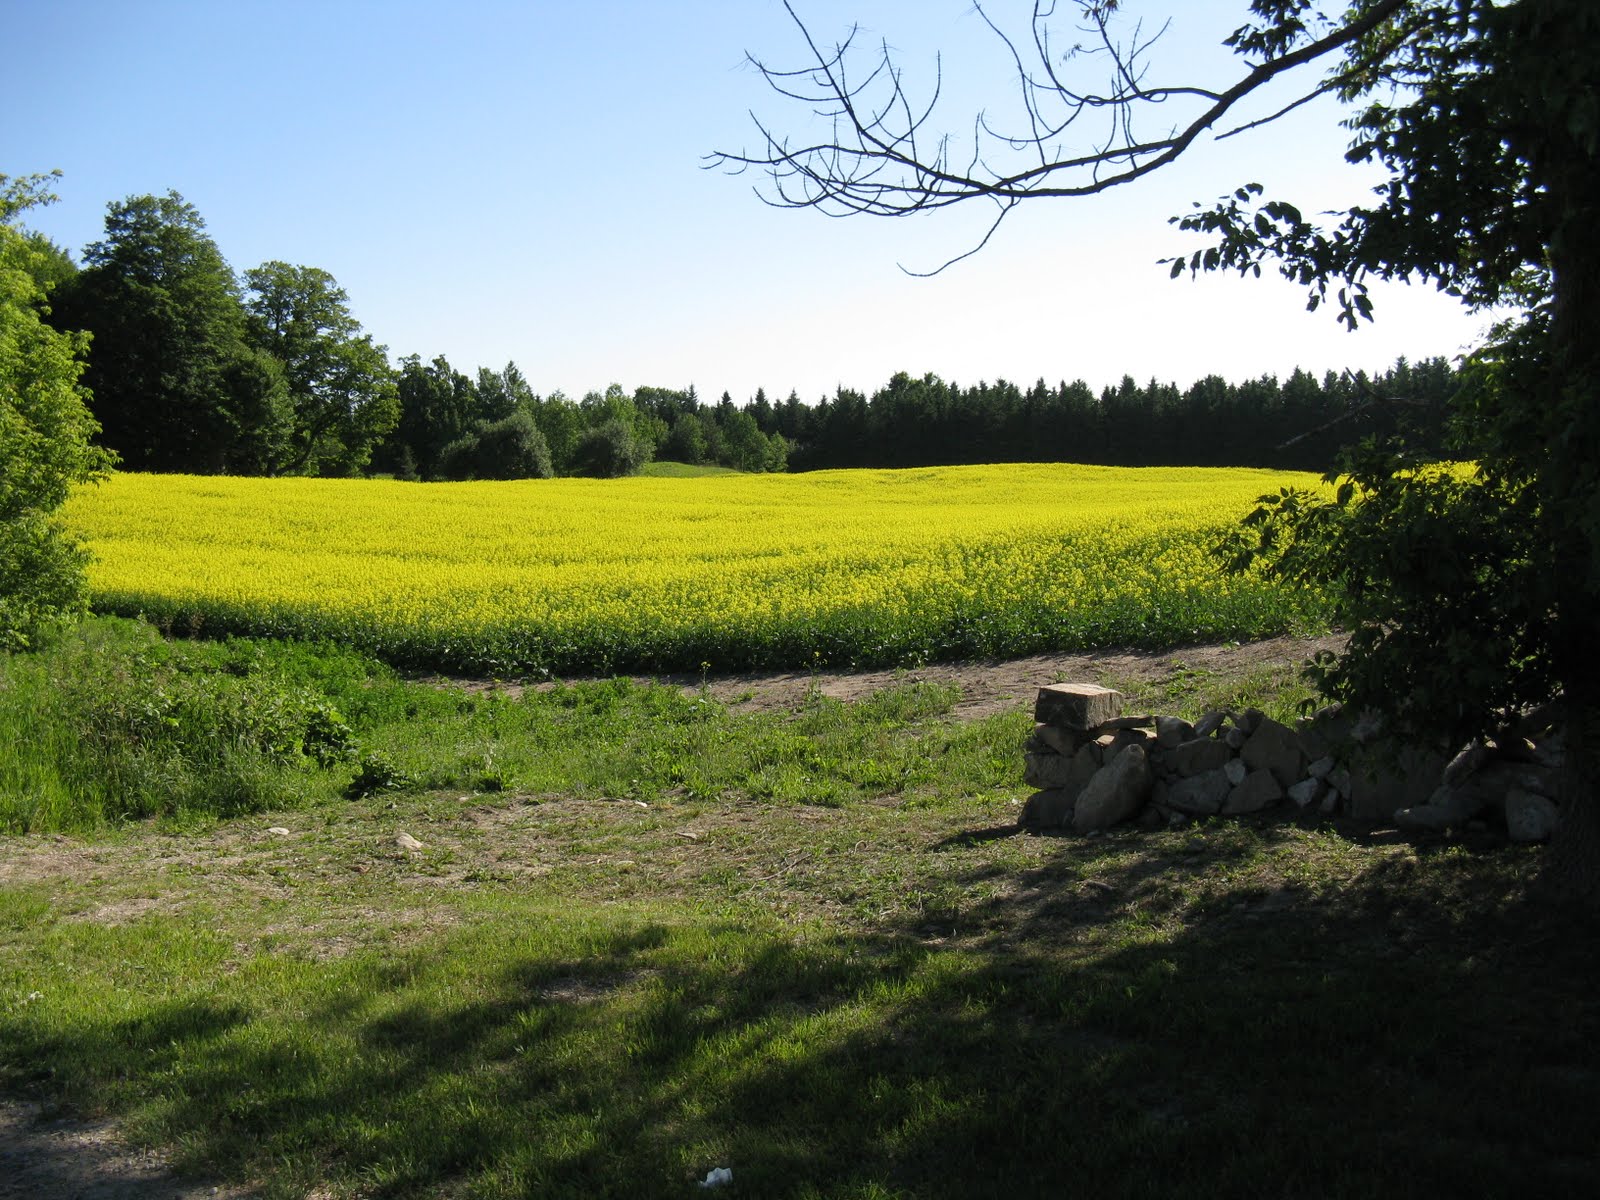
Here we have a "tree" in front of some overlapping "rocks".  Substitute what you like for these elements.  The colour temperature of the other shapes indicate depth without greying or value change.  No question there is depth, and the eye doesn't drop off the back.  The image is flatteded and is in concert with the 2D picture plane.  These concepts had many implications in modern art, all espoused by Hans Hoffman and employed by Picasso and Matisse et al.  Variations on a theme.  Individual tools for the kit box to be used as deemed fit.  These are not either or, they can be mixed and matched.

Tree with Rocks in a Stream Bed

Here the planes are tilted on their sides as if looking at a slip shod set of patio stones.  Dynamic.  Notice the planes used in the first examples.  They are drawn by hand.  Much more interesting than those done by ruler.  Just like nature!

Sunday, July 24, 2011

Cropping, Portraits, and In the Landscape

Out at Scotsdale Farm last week, Terry moaned about her penchant for "going big" with her subject matter.  She thought that my approach was more artistic.  Not necessarily.  She is essentially painting a portrait.  Here is a sample of her house portrait.  Nice light.

Bennett's Hang Out

This pretty much shows the house full frame.  If that is your concept, paint it.  Make it interesting.  Nothing wrong with that.

Here is a different concept.  The point of interest was just a part of the building.  So the area was cropped to help focus on that.


In Red Oxide

The monochromatic was also part of the concept to learn about the use of grey.

Here is the concept of putting a subject (buildings in this case) in the landscape.  The interest is in the lay of the land or the context of the subject.

Servant's Quarters


None of these is right or wrong.  Terry has decided to try all three concepts in a series of paintings.  A great way to learn and develop.

Thursday, July 21, 2011

The Hay Bales Part III

It is quite astonishing how the light and colour change throughout the day.  Morning light changes quickly until mid morning.  The prevailing colour tends to be yellowish.  From then through mid afternoon the rate of change slows, the shadows are close to under the object, the hilites are on the top of objects somewhat bleached out by the sun.  As the day progresses, the rate of change increases, the prevailing colour goes towards orange, the shadows elongate, the hilites are on the sides of objects perpendicular to the light source.

Late Day Hayfield

This version shows some of what I would expect on a sunny day in the evening.  The arrow shows the light direction.  The shadows would be quite long this late in the day and they would be consistently in the same direction.  The shadows would be cool.  The area at 7 would have some warm areas affected by the orange late day sun.  Sometimes this is red depending on the atmosphere.  That area would still be dark on average with cool shadows cast (to emphasize this you could indicate some trees to provide structure). The yellow would disappear from the depth but the depth would be lighter.  The tree line in the rear would be lighter, greyer, with some warmth (cooler than the foreground) from the sun.  The green shadow (balancing the image) in the right foreground will remain cool and get lighter as it recedes.  The sky often displays a gradation in value and colour.  Lighter and warmer towards the source of light.


"I have worked on my painting and now it looks like this.  It is so hard to remember all these things.  Thanks for the help.  I know I have more to do, but even my husband likes it!"


Monica's Backyard

I showed it to Karen.  "I like it!"  "Do you like it better than the original you said you liked?"  "OK, I get it, I see why I like the new version.  I understand why getting better means that people will see and appreciate the quality.  Still, I see why Harold is right.  People will still buy anything if there is nothing to compare to."

Tuesday, July 19, 2011

Evening Hay Bales - Part II

"I see, I've changed some bale sizes based on the linear perspective.  What about the values and shapes?"  I sent her the following;

"Here is your painting with the values you chose for various shapes.  Darks will be darkest up close, yellows disappear quickly in depth as does the value.  Remember there are other ways to skin the cat.  I assume you are learning how to create from what you see.  IE, learning how to see."

Hayfield Value Pattern

I checked the values with my value scale choosing the average value for the major shapes.  This composition is simplified with respect to the number of shapes.  That is easier to deal with and to paint when you have little time.  This value scale has the lightest at 0 and the darkest at 10.  You generally reserve the lightest and darkest values in case they are needed at the end.

"I see I have some value work to do."

"So, late afternoon. Then shadows should be consistent, hilites consistent, values correct. Then colour, edges etc. As a generality, sky lightest, tree line darkest (vertical), flat area second lightest.  Late day sun usually orange like, so tree line would not be cool since this is in the sun.  Cool shadows within of course." 

"How did you know this?  You have only seen the painting."

"I have been out in such conditions many times so it is in my observation memory bank."

"I guess I am still not seeing but painting what I think."

"Here is a thumbnail I did in a couple of minutes based on your painting and my memory bank."

Thumbnail - plan, think, speed

The thumbnail is the end product of the concept development.  It is the thinking part.  It shows shapes, values, composition, light direction, colour and various notes.  Here it suggests paint stroke direction and inferred lines for the undulations in the field.  This takes little time.  It facilitates staying on concept and speed.  Essential when the time is compressed.

Next, light direction, colour temperature, shadow pattern, hi lites and accents.


Sunday, July 17, 2011

The Case of the Evening Hay Bales

"The neighbour rolled his hay this afternoon.  I just had to get out there and paint them last night.  I didn't have much time.  The sun was going down."

Hayfield 1 As Done

" I really like it" exclaimed my good wife.  Well, that brought back an echo from Harold.  "People buy any kind of crap".  I passed that echo on to my wife who said, "I just like it".  "What is it you like about it" I asked?  "I like the colours".  Aha!  So, in this case maybe the vibrant colours covered up the rest of the painting's attributes.

We had been talking about the eye level and its use in representational painting.  More specifically, we were talking about evolving as a painter who is learning to Paint (more or less) what you see.  (It is important to understand context in your development.  After all there are no absolute rights or wrongs.)

Here is the first email response to Monica.

"Here are a few images showing the eye level and the lines used to size the hay bales.  You should have this my measuring during observation.

"The last image shows the distance from the viewer and thus the sizes for that distance.  Let me know if this makes sense to you please.

Of course in nature the sizes do have some variation - makes it more interesting, but not THIS much.  Makes the painting look like the painter didn't know or observe.
"

Hayfield 1   Eye Level

The eye level was shown according to what the painting image told me.  Monica confirmed.  There was a dip in the field putting the bales below the eye line.  That will affect how the bales are drawn.

Hayfield 1  Simplified Linear Perspective Lines with Distance Planes

This diagram shows the distance of various bales from the observer.

Next issue concerns "Values".

Wednesday, July 13, 2011

A Little More on Linear Perspective

I have had several questions concerning the eye level.  "I don't get it, there is no perspective in the painting, etc."  "What do you mean "structure"?"  "In the sky, the forest, the water?"  "Drawing, I thought you didn't need that to paint landscapes."

Eye Level Indicated

This is the beginning of a scene on the water.  If you observe water you will find it is always seeking to level itself and find the lowest level possible.  Gravity.  So here I have just indicated my eye level in thin paint.  It will disappear as I go, not to be part of the finished painting.  I placed the eye level above the middle of the canvas.  This was done to support the concept I had, not to follow some rule.

Darks of Features Added

You will notice that the eye level is above the shore line.  It will become obvious that shoreline features will run above and below the eye level.  Water (unless we are looking at a falls or a tidal wave) can't get above the eye level.  Here the eye level is at the base of a large hill.  If this were a lake in a flat desert the eye level would coincide with the horizon.  But here you can't see the horizon.

Features Added along with Shapes

You will see here that a shape on the right side has been indicated - closer to the viewer.  The hill value is beginning to be loosely brushed in and a start for the water and its reflections are beginning.  Note that water and reflection.  It is not the right value or colour at this moment.  However, it already appears different from the background.  I have already begun to indicate the linear perspective lines in the ripples in the reflections.  Here it is a reminder to me.  I showed it in my thumbnail when composing the shapes and values and locating the eye level on the canvas.  So I am using the eye line to guide the placement of these little indicators.  They go to the far shore and thus behind the shape (island) to the right.  In fact, the water also goes back beyond the shore line where there is a small bay behind a rock.  That small bay cannot have a water level above the eye level - or the drawing will not look right.  A discerning viewer will spot this immediately.

Coming Along

At this stage the little indications have disappeared having served their purpose.  It is not so obvious in this painting but there are linear perspective lines in the forest as well.  For this type of painting, the largest trees will be in front closer to you.

Now, having said all of this, there are many ways to skin the cat.  I'll talk about some of these later on.


Lower Lookout, 10x12, Oil on Canvas

Sunday, July 10, 2011

Fixes on the Fly

This time we hiked into the interior of Rockwood Park.  OK, so it is a small park.  Bobby's knees are past warranty.  Remember everything you need.  No second tripping to the car.  We found a spot and began to set up.

Bobby's Ready.....

Shade, a bit of a breeze.  Beauty all around.  Then Bobby brought out his vice grips from a 15 pound bag of tools he had lugged in.  "What are those for?"  "I use 'em to tighten up my tripod.  All the nuts and knobs have disintegrated."  "What is that easel made of?"  "It's plastic.  So light its incredible."  "But you need a set of tools for it."  At that instant, down she went.  The whole kit and kabootle.

No Hands to Paint With......

  ~>"**^j#@!  "I'll have to go back to the car for my French easel."  "You'll never make it back.  That thing weighs a ton.  I'd have to send out a search party for you."  "Well, I can't paint like this."  "Hold on, let's see what we've got.  What's this?"  "Its just a strap I use to tie the tripod in this bag."  "Since you have the pochade box fastened to the tripod, maybe we can jury rig a tie down for it".  "I think you're right.  Its just the swivel I can't tighten.  If we can get a good knot here............."  "You're in business.  Just clean up that mess and you're off........."

First We Paints Ourselves................

Settling down we both got relaxed and started painting the island scene before us.  Side by each we painted our versions.

Bobby Small Brushin' In the Sun

By this time the sun had moved creating different light and colour.  Bobby got a little fried in his determination to get on with it.  We packed it in to finish in the studio.  Bobby was off to by a real tripod.

Wednesday, July 6, 2011

The Eye Line, An Assist to Drawing

We were out painting the other day with a few other painters, one of whom was new to it.  She asked about perspective.  I summoned Vic to do his atelier thing.  Everyone gathered round.  He explained that he starts his paintings by indicating where the eye line is.  The questions came.  "Is that the horizon?"  The response, "It could be".  Questions ??? "Could be?"  Response, "If the land is flat, as in the desert of on a large body of water".  Question, "Isn't it where you are looking?"  Answer, "No, it is your look ahead eye line".  "Your eye line could be at the base of a hill or mountain, or looking off over something in a valley."


Here is an example.


Barn From the Road

Here the eye line indicated is below the foundation of the barn.  I was standing on the road.  The barn was on the top of a small hill.

Vic continued to demonstrate that the linear perspective lines always go down (or up, depending on where the eye line is) to the eye line.  

Linear Perspective Lines Indicated

Here the linear perspective lines are shown as they approach the eye line.  The point at which they meet the eye line in this case is off the page.  Note that the two perspective lines to the left would meet the eye line at the same spot.

In this painting I was playing with the structure, distorting it on purpose to make a picture more interesting.  But, I still have to understand the principles to make it believable as opposed to a comic.  In many paintings the perspectives lines are not so obvious.

Alton Shed

Vic proceeded to say that there is perspective involved pretty much everywhere.  In the clouds, roads, fields and so forth.  "Why didn't anyone teach me this in art school?"  Who knows.  It can be used in abstracts as a method of indicating depth, even when flattening the picture plane.  You don't have to be formal about it.  Merely indicate it.

Our beginner than ran off the evaluate the juried art show next to the coffee shop.  Running back she exclaimed "every painting in the show has major errors, come look, tell me if I get it."  She got it.  Everyone began to understand why some of their paintings lacked structure and why their drawing looked unbelievable.  Now to practice.....


Saturday, July 2, 2011

Early Greens Surrender

Here it is just past the first day of summer.  Look what I saw on that longest day.

First Cut, Late

So I looked around and....

Rafting on the Credit

Look how the oranges have crept in.  Still surrounded by green but the better days are coming fast as the sun burns out the spring green and the days begin their shortening towards that great painting season (afraid to say it yet).

Here is one that is a great challenge.  You just can't do this from a photo.  You have to be out there with the bees and yellow jackets a buzzin'.  Try it, share it.

Canola

It's not easy being green.  Not to worry.  Now you can avoid it or choose to learn how to deal with it without moving to the seaside.  Along the country roads everything is going to seed.  But still everything is dominated by green and will be for 10 weeks or so.  Paint on.