Wednesday, April 27, 2011

How Was Winter Painting?

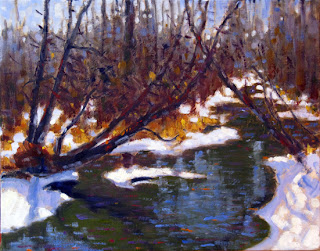
If you are "always a student" you won't be able to find a bad winter for painting.  This one was no different.  We were out two or three times a week.  Snow, blow, cold or melt, makes for great experiences. It helps that we have done this enough that we have developed ways and means.  Looking for small valley shelters, hiding behind trees, working with snow on the palette - mixes well with oil,  there is no bad winter weather.  Ignore the forecast and get on with it.

This winter we observed a few things.  It was not particularly cold.  The snow at our northern painting area was lighter than in the southern area.  In the south it was maybe average.  There was no frost.  The thaws were deep and fast.  More wind than usual.  Lots of moody skies.  Standard was the simplifying effect and the eye training for colour and shape.  We have only a 7 month wait for the next instalment.

Here are a few samples from March 2011.  I painted larger this year so I refurbished the French easel for that.  Up until last week I had never been blown down with it even with a larger canvas (30x30).

Alton, sunny and warm, -2C

Done along the creek beside the Alton Mill.  As - is from plein air session.

Scotsdale Farm, cold, windy, sunny and cloudy

Stowe Vermont, late day winter light

I like to get to some unfamiliar areas to paint.  So, while skiing.............

Hockley Valley, construction concepts

Cold and sunny, and familiar with the area.

Stowe on Skiis

Skiing keeps you warm.  A near blizzard followed this.  You feel lost up high.

Mistake Valley 9AM

Fell upon this little valley.  A series is in process.  2 done in late March.  Soon another visit.

Deer Family

This was the last hoorah in March.  Done on the 31st.  There were others in March.  All of the above are in the "as - is" state after painting on site.  Varying degrees of finish will be applied in the studio.  I use the thumbnail with its notes and my memory to finish off the painting.  Sometimes they fly as they are (signed).  You can pick out areas to refine looking at these images.  

Now we are in mud and stick season.  My strategy to avoid that (it is almost over) this year is to do a series of townscapes.  I have been out 5 times on that mission.  Next week I head to New York City, then along the New England coast.  Anything for a diversion, but always going out there.


Saturday, April 23, 2011

Blown Down Plein Air

It happened for the first time today.  At least with the French easel.  A warm front was blowing in.  I was aware of it as I set up on the first bridge in Glen Williams.  Set a larger canvas up - first no no.  Set the canvas up high for a good sight line and minimal transfer distance - second no no.  Put my back to the wind - good protection.  Got into the painting, then, I stood way back to get an overview - third no no.  Blown down she went.  Emptied everything out and pushed a brush over the edge of the bridge along with my palette knife.  Retrieved the brush.  By-by palette knife.  It's just as well, I found that palette knife, so full circle.  Paint all over me, my sketch book, my easel, my back pack.  Should transfer well to the car and the couch.

Here is the evidence.

Thumbnail for Blown Down

I had just squeezed out a lot of paint.  Quite a bit of it is sealing the old sketch book.  Here is what I was looking at before the event.

Overcast Reference

The design shown in the thumbnail - OK it is hard to see - came early on before the sun broke through.  Once I got painting I was able to key values and colour to the sunshine before me.  But I was shaken by the blow down so I quit at this stage.  I had enough to finish in the studio.  Here is what it looked like in the studio.  A lot of work to do.

Blown Down stage 1

Today I started with an oil primed canvas that was prepared with a coloured ground.  This is quite in your face.  Usually I start with a greyed hue like Ultramarine and Transparent Red Oxide, and most of the time I wash this on wet, then proceed in the wet.  So today was an experiment with Brown Pink used as a dry coloured ground.  I knew I would be OK when I got the canvas covered in the startup phase.  I didn't get that far en plein air today.  But I did in the studio.

Blown Down stage 2

Now we can do some significant painting.  It might be interesting to compare this with the reference to see what has been altered.

Wednesday, April 20, 2011

What's Coming

I'm sitting here watching the rain.  Cold and damp.  Temperature is rising.  Hard to paint in here when I'm thinking about what is and what is coming.  Temperature does it.

A Hint of It

Maybe a hint, but this is a bright mud and stick season image.  Early April.  Even now the part of my palette that has been getting limited work all winter is garnering more attention.  The Ultramarine Blue is searching for yellow ochre, cad yellow light, cad orange, cad red light.  The combinations are looking for mineral violet, alizarin crimson, even some white.  Ditto for Viridian who also is seeking transparent red oxide.  Cobalt muscles in too.  They seem to know it is coming.

USG Prestages This

Ugly Slime Green comes early and doesn't last long.  Its near cousin gives us this.  Then we get.....

Monochromatic in Green

But even here we can see colour starting to creep in.  Your challenge is to make it a painting.  Many painters I know stop painting in the summer.  They just can't take it.  Even Tom Thomson didn't paint summer scenes.  If you are addicted though, you develop strategies for dealing with these things.  Some of these include;

  • do a cropping of a coloured object from the landscape
  • work in the studio
  • work from your imagination
  • take a trip and paint the non green landscape
  • paint water motifs in rivers, lakes, and oceans
  • paint town or cityscapes


The key of course is to keep painting to put on the miles - always with a concept or course - it keeps the development happening.

Tuesday, April 19, 2011

Still Life Teaching Under the Sun #2

This week I changed the setup.  The light was cool from the overcast day.

Red Onion, Pot. Dish Towel

Compared to the last setup this one sports cloth and the red onion and its skin.  There is no formal backdrop.  The light is north and and the sky overcast.  All challenges in themselves.

The concept was left for the student to write out.  Then we discussed what the aim was.  The painting was to look loose with prominent brush marks.  Basically a version of realism.  She wanted to reduce her dependency on drawing.  She did a thumbnail to determine the composition and the value of the shapes.  Again, she did only one, failing to try out other options.

We went over some of the principles.  I was slowing her down, getting her to look and hopefully "see".  Look, mix, place the stroke, look, mix, place...  Every plane change has an associated colour change.  She began to tentatively mass in the shapes.  She proceeded to move the aspects of the painting along taking the shapes closer to completion, comparing one to the other.  You can see what I saw.

See What I Saw

Observations,

  • Slower approach, trying to observe, see, and do
  • Trouble with shapes - seeing
  • Trouble with values - seeing
  • Trouble with colours - seeing
  • Still rushing to use same load of paint instead of mixing - licking
  • Using thinners as a watercolourist and getting mud, but improved, thicker paint for brushstrokes
  • The rigid evidence of drawing all but gone
  • More comfortable in the painting process


Now, for this session I decided to setup beside her and paint along making a running commentary about what was going on and answer questions as they came along.  Mirroring a relaxed approach, this buddy system seemed to be welcome and have a positive effect.  Now it is practice, practice, practice, but with a specific concept in mind.  That insures that a lesson will be learned with the practice sessions.

Wednesday, April 13, 2011

Mediums for Oil Painitng

The list of mediums in the reference books (The Artist's Handbook by Meyer) is quite extensive.  Their use varies from thinning paint, thickening paint for impasto, transparentizing paint, glazing, slowing drying, speeding drying, improves flow, and extending.  The standard approach from the day was a variation on;
  • varnish - 2 parts
  • turpentine - 2 parts
  • stand oil - 1 part

Some added cobalt drier (toxic) to the mix.

Turpentine is frowned on these days because of its toxicity.  So now people substitute Odourless Mineral Spirits.

Here are a few mediums that I use or have used.

The Chemist's Lair

From left to right these are;

Walnut Oil - by Graham, thins and extends drying time
Morager Medium - thixotropic, this thins or thickens with the brush, speeds drying, makes paint flow*
ZEC - by Grumbacher,  greatly speeds drying, thickens, improves flow*
Alkyd Butter - by Gamblin, speeds drying, thickens, improves flow*
Alkyd Medium - by Stevenson, speeds drying, thickens, improves flow
Alkyd Gel - by DVC, speeds drying, thickens, improves flow
Walnut Alkyd - by Graham, thins, improves flow, greatly speeds drying
Liquin - by Winsor Newton, thins, improves flow, greatly speeds drying

All of these make paint more transparent and can be used to glaze.

* product contains petroleum distillates - easy to smell

I have experimented with all of these and variations of the old stand bys.  For me each has merits.  My usage is now restricted to 3 of these depending on what I am trying to achieve.  For example, If I am trying to make my signature dry quickly I use Walnut Alkyd.  In general I use an alkyd gel but I don't like one that dries too quickly, so en plein air I usually do not use these.  Most of the time I use the paint unaltered from the tube perhaps with a touch of mineral spirits at the beginning of the painting.  Having said that, yesterday I used an alkyd gel from the get go to start a painting.  I was only out an hour or so and the weather was not real warm, so fast drying was not an issue.


Monday, April 11, 2011

Still Life Teaching Under the Sun

Harold was waiting for us even before I made the setup for a simple still life.  I made a box corner to house the setup and chose three objects.  The largest item was a ceramic honey pot.  It was the darkest local colour.  A ceramic sake bottle with a light cool local colour was the second item.  The third item was a lonely red grape placed out in front of the two ceramics which were in partial shadow from the box corner.

As if scripted the two students arrived and were chomping to put down paint.  "It's such a simple subject".  However, I slowed them, went through the purpose of the exercise (which included increasing their batting average of good paintings made, and learning to see), got them to think about the concept of the painting they were about to paint.  Indeed, I had them write the concept down, and do a thumbnail to check for value of the shapes and their arrangement.  They rushed through that!  One shot, no alternative evaluations.  Harold was working overtime to keep his mouth shut.

You can see what I saw.


Maybe If We Start at the End.....


Maybe if We Start More at the End....


OK, Lets Draw an Outline....


So, what were the lessons learned from this exercise?

It is difficult to try to remember all the things you know about painting.  Even more difficult to try to put them into a painting.  Learning doesn't come all at once.  Patience and practice.  Eventually it will come together, but only if you work at it.  Evaluate what is learned from each painting session.  Thinking about the task at hand before you begin gives you a marker to evaluate learning against.


Friday, April 8, 2011

How Do You Know You Are Improving?

Living master David Leffel commented "If you are an abstract painter, how do you know if you are improving?"  His premise is that you have only a few variables to work with as a representational artist.  These are; the concept, holding the brush, shapes, values, colour, edges, and paint quality.  Oh, and did I mention your ability to "see"?  Now John Leonard believes that abstract painters have the same elements to deal with.  Quite a contrast to just throwing paint according to your emotions etc.

Pines - no concept but to copy

Tomorrow I get to pinch hit teaching people who are ready to start a still life.  Part of the mission is to get them to think before they get going.  I plan on doing this by having them do a concept description.  The concept deals with how one strategizes about the painting and how it will read, or what the painting is about.  They will thumbnail shapes to derive a value pattern and composition.  Then they will choose a colour strategy, consider how they will paint the picture, where in the style spectrum they will chose to be, how they will approach edges, and determine the quality of paint they will use.  As they progress, my role will be to ask them about their execution compared to their concept, offer pointers and demonstrate specifics.

 Simple Still Life - full concept

In our case the still life will be painted outside under the sun.  So things will be moving and the light will be changing.  As the light changes they will do a second painting from the same setup.  Keeping these studies allows one to revisit in quiet times and observe elements from painting to painting hopefully seeing the improvement in the various elements.  You may not like what you see but you will be able to see changes in ability.

Sticking with the concept is often quite difficult.  The concentration wanes, a mistake looks great and one chases that, the inability to execute an element causes frustration, someone interrupts saying the painting is no good etc.

Here is a piece painted from imagination.

Observations?

And here is another piece....

Observations?

Monday, April 4, 2011

Canvas Preparation

For my oil painting I prepare my canvases with an oil based ground.  This is done for several reasons.

  • Oil paint on an oil ground yields a good chemical bond (not just a mechanical bond).
  • The surface is much less absorbent than gesso so the intensity of the paint stays high.
  • The paint sits on the surface.
  • The paint is easily shoved around (manipulated) on the surface.


Here is how I start.  In this case I am using Grumbacher MG white.  I like a lead white as well.

Notice the contrast with the Oil White - Brilliant

Please pardon the colours in the studio.  The camera thinks this is a warm white.  Not.

In order to fill the pores of the canvas I spread the thick paint with a knife.

This is thick and gooey - and fast drying

I then smooth the surface with a brush.  The degree of tooth and texture is a personal thing.

Usually I use a large hardware store bristle brush

When this is dry you might want to sand it to your preference before future steps.  You can use as is with the brilliant white helping for high key paintings done in one sitting.  Or you can colour the canvas with the ground colour and value of your choice.  This aids colour harmony and makes colour and value judgement easier.  The following canvas was stained with a transparent red oxide, ultramarine mix applied with an alkyd butter.  This gives the surface a strong set of layers to work on.  It is really a second layer of oil base.  This makes the surface "fast" and stops the paint from sinking in and losing its intensity.

This was applied with a rag

The surface is very nice to work on.  Holding the brush loaded with paint and making the stroke with the side of the brush deposits paint according to the pressure used.

Here is a loose canvas patch prepared the same way using yellow ochre, red oxide and alkyd butter.  The paint is applied with the flat bristles to deposit the paint.  I like the loose canvas when I am travelling by air.  Twenty canvases are around 1 cm thick - and light.  I travel very light with just a back pack.

Hold the brush using the full handle to deposit the mark

Wrong location?  Just change the brush angle to pick up the pile of paint and deposit it when it should go.  The angle used is like using a scraper.

No blending or licking, just pushing and moving