Monday, August 29, 2011

Plein Air Truths from Observation

My first paintings were done outside.  At the time I had no idea why.  The painter who got me into painting was trained that way so that is what I did too.  Now I understand some of the reasoning and I feel that I have to paint en plein air for regular tune ups at least weekly, rain, snow, wind, and sun.  It is like getting regular exercise so your body is fresh, strong, and supple for other activities.

Here are some of the truths gained by observations while painting in the great out door studio.

1.  Mother Nature designs in irregular patterns, lines, light and dark patterns, and shapes.  This is contrary to man who lays tile and bricks and everything else in regular symmetrical patterns.  Boring.

2. Studying colour outside will show you how they work together.  You have to learn to see what is actually there, not what you think is there.

3. There is lots of "stuff" there.  Can be overwhelming.  Cannot be copied.  One must learn to simplify and design for interest.  Each line and shape that makes its way into the drawing must be interesting before the painting begins.  If not, its too late.

4. There is a lot of blue in the distance.

5. Yellow fades out quickly as you look into distance.   Darks are often darkest in mid distance.  Look at the value patches across a road as the road moves away from you.

6. Facing the sun, or otherwise keeping the palette, your eyes and the painting surface in the shade helps with keeping the darkest darks not too dark.  Wear a brimmed cap to help.  There is a lot that can be expressed in the shadows.

7. Your setup must be comfortable for you.  Sitting, standing.......

8. A finished painting is not the usual en plein air.  You should get a design (installed not observed), shapes, lines, colour notes including temperature, values, edges, and paint quality.  At least indications of these.  This information can then be used in the studio to finish.

9. Although you may not get a finished painting, you will get training regarding design, shapes, values, and colours.  Work at it and you will learn to "see".

10. Reserve darks, lights, and chroma.  This will allow for a few finishing strokes that make the painting come alive.

11. Make every piece of your gear count.  Brushes, paint, easel, canvas, sun protection, drinking water..........  Some of my favourites are an egg timer, camera, peaked hat, coffee mug.

12. See the red in those greens.  Modify. 

Yesterday we came upon this birch in its surrounding.  Can an interesting composition be made for it?

Grey Sky, Courtesy of Irene

Friday, August 26, 2011

Glen Williams Assault

It was almost a men's day, but we were saved at the last minute as Carol joined us.  A superb summer day in the beginning.  We met at the Williams mill and spread out, some painting side by each.

Rod and Vic doing the book shop

The complex of odd angled structures that include a lawyer and book store caught a lot of attention.  The shapes were intriguing.   If you get the value of them well and put them in a decent composition you are half way to a good painting.  

Dick minding Daisy while painting the book store - seen across the street

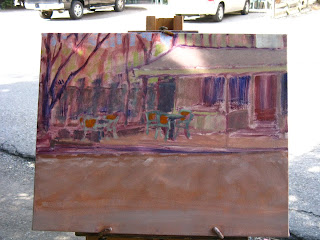
Interesting that we talked about shape and value while relaxing into a start.  As for me, I decided that the shade was inviting near the book store that the others were painting.  I set up and painted back at them, doing the Glen Oven and waiting for it to open for a mid morning coffee.  Before I got far into my painting Dick ran across the street and asked a lady to move her car from the front of the book store - he was doing an architectural painting.

Basic Lay-in

Well, I guess the concept was OK.  I proceeded to refine the drawing while doing the tones/values.  The further I went the more trouble I encountered.  I had demolished the values - we had just been talking about that.  Maybe the discussion confused my brain.  Then I put down tones that made it worse.


Long Road to Correction

Stepping back I noticed that the painting was nearly cut in half.  Top to Bottom and left to right.  At least I knew what was wrong so I could set out to modify in the studio.  The trip for coffee and back to the studio gave me a rest.  So, I worked on the original concept, using the thumbnail and the palette knife.  Scraping it off can be a painting technique - or an erasure.  I got it to where I originally aimed to get it on site.

The Glen Oven - Ready to Finish


Sunday, August 14, 2011

Genn's Lessons

I have been reading the Robert Genn newsletters for more than 10 years, almost from inception.  Not only is he a successful painter but he is extremely active in the art world (and elsewhere).  He helps anyone interested in art through his sharing of his process, philosophy, and humour, and he does occasional workshops.

One of his readers shared the ten most important things she learned during a recent work shop.

"Here are my top ten things that I learned at Hollyhock";

10. Look three times. Think twice. Paint once.  No Licking...

9. Humming like a bee is cool.  Visual and auditory mix....

8. Load your brush.  Paint like a millionaire....

7. Veggies make me feel good.  Stay mindful and relax....

6. Life is a gift. Art is a gift. Be grateful.  Buddah says....

5. Blue glazes.  Unifying colour....

4. Stop apologizing.  No guilt required....

3. Fathers and daughters can be pals.  Really....

2. The greatest gift you can give to the world is to be your most awesome self.

1. Go to your room.

I remember the first time I came across "Go to your room" from Robert.  It basically sums up what has to be done to advance your craft.  This was later supported by Malcolm Gladwell's "Outliers".  In that tomb Gladwell expands the activity in the room to include a learning feedback loop, else you do the same old thing and get what you always got.  Another respected artist who actually knows art could fill this role nicely.

From the teaching I have done, this advice fills the largest need.

Paint on.

Too Much On?  Scrape it Off!

Friday, August 12, 2011

Problem Solving Check List

Here is a short list of aids for making a problem tangible.  I am sure we can add to this without boundaries.

Careless drawing - not measuring, no idea of perspective
Wrong shapes
Too many sharp edges
Painting what you think you see, not what is there
Too many values
Wrong values
Jumping from concept to concept
Incorrect temperature changes
Too little paint
In a hurry - finish before starting
Overworking
Working from photos, in the context of concept
Poor working light
Failure to squint for edges and values
Too many hilites
Garish colour
Wrong colour
Improper paint quality - thick, thin, texture
Aimless brush strokes - licking
Glare on canvas
Copying
Shadows off value

Today I had a hard time mixing colours.  Just me.  I could see what I wanted to do.  Maybe my blood pressure was up.  Tomorrow is another day.

Gairloch's Monet, 16x20, Oil on Canvas

Monday, August 8, 2011

Problem Solving - Making It Work

Why isn't this working?  Have you ever asked yourself this question?  Or, has someone (wife, mentor, observer, respected artist........) told you that your effort isn't working?

Row on Row, a Beginning

Just what does it mean?  It means that things on your canvas do not look like they were intended to look like.  Your concept is not being rendered.

When you place strokes on your canvas that bothers you or doesn't look true, do not leave it and go on elsewhere.  Sometimes these elements are difficult to identify, poor drawing, colour that doesn't belong, shapes that are off, values wrong and so forth.  These will haunt you until they are made right.  This is because all the elements in your image are interrelated.  If you go back to correct later you often end up with so much to do that you don't bother "I had fun, but I'll have to see if I can save it in the studio".  If everything is off, where do you start to bring it together?

How do these train wrecks happen?  Usually there is no clear concept, or the concept changes continually. I find that many people are impatient and try to finish before starting or going through the one stroke at a time process.  No measuring, avoiding drawing, not seeing but rendering what you think you see.

So, when things do go wrong don't give up, don't put it away so it will paint itself, don't dab at random, don't fake it, don't twist the painting to fit the problem.  Instead go through the process of elimination.  You must make the problem tangible.  The opposite of "it doesn't work".  Your problem (not the painting's, the circumstance's, or the subject's) can only have problems in value, shape or drawing, colour, paint quality, or edges.  So which one is it?  By elimination it might be a value problem.  If you have, or establish, one correct value you can compare the others and make the correction. 

Rockwood Early, 10x12, Oil on Linen on Board

Sometimes it is more difficult and a set of interrelated problems exist.  For example colour passages often have a value error embedded.  or a drawing problem often has edge problems.  No matter, the process of elimination and comparison is the best way I know to straighten out an image.

I'll follow this with a check list to assist in the process of elimination.

Monday, August 1, 2011

Modern Art Concepts

A friend of mine has been taking the elements of modern painting and applying them to portraiture, figure painting, and the landscape.  He was trained in New York City by a Hans Hofman disciple.  In his early painting career my friend was a minimalist abstract painter.  Here is a painting done in 2011.

Rosedale Valley, Ross Skoggard 2011

This is quite a way from traditional painting.  I came from a traditional painting beginning.  Here is a recent painting of mine in which I am playing with modern painting techniques.

Captain Brock's New House, 16x20, Oil on Canvas

It seems Ross and I are coming from polar opposites towards some middle ground.  My non art school approach has been one of ceaseless experimentation, some art history reading, and time on the easel.  It seems that Hans Hofman's modern concepts originated to some degree from Paul Cezanne by way of Monet and the impressionists. These artists were concerned not with pure realism but rather making their own statement about the art they created.  For example, Monet was concerned with the effects of light from specific sources at specific times, not with the object itself.  The concept is oriented towards creativity as opposed to pure likeness.

See if you can spot some of these elements as used in the above paintings.  Look for;

Line - the use of line to show planes, define positions in space, draw attention etc.

Planes - the use of drawn planes to show depth, to attach colour changes, stacking to indicate depth.

Distortion - the changes to shapes to activate them, flatten the picture plane, or show another view point.

Visible Brush Strokes - used for emphasis or expression, unfinished to make sure the observer knows she is seeing a painting.

Paint Quality - flat painted shapes, or impasto, or modulated strokes and colours, or edges that are poorly defined (for example, a tree just stuck in the ground as opposed to appearing to grow out of the ground.

Colour - Apply a colour change where there is a plane change, indicate depth or form, add expression and life instead of employing greys .

Flattening - to shorten the picture box (a landscape into a still life for example), keep the eye inside the painting (instead of falling out of deep holes), to stay in concert with the tow dimensional canvas.

Here is a Cezanne for your reference.


A Mont St. Victoire, Paul Cezanne